Numerical or descriptive urls

August 18th, 2014

The most popular way to set up your urls these days is to use the title of your content or some parts of it, mainly for seo optimization, f.ex. http://www.example.com/insert-title-here or http://www.example.com/keyword1-keyword2. The other sensible way is to use some sort of numerical system, f.ex. http://www.example.com/node/12 where 12 is a numerical id for the content. So let’s examine some pros and cons of both.

SEO optimization

Descriptive urls contain some keywords that might boost your search engine ranking, numerical urls do not.

Permanence

There is no good reason to change a numerical url, except if you move your site to a different cms/framework. Descriptive urls might change if you change the title of the content.

Internationalization

Numerical urls adapt well to internationalization, f.ex. http://www.example.com/node/12 can be http://www.example.com/de/node/12 for the german (DEutsch) translation. So you will have a simple mapping between languages and no other logic is needed to point to other language version. However, this depends on the CMS you are using and it might not always be possible to do it this way. Descriptive urls will have to change more because the title will be completely different on other languages. This means that you need some programming and cpu cycles to find the corresponding url. You might be able to use http://www.example.com/de/english-title-here but you will then give up every other advantage of descriptive urls.

Descriptiveness

Descriptive urls give away some information about what hides behind it, numerical urls do not.

Length

A numerical url will typically be shorter than a descriptive url.

Uniqueness

Numerical urls will not collide because each piece of content has its’ own unique id. It is possible to end up with the same descriptive url for two different pieces of content, but in reality this problem is rare.

Using **kwargs with CherryPy and WTForms

June 23rd, 2013

I just ran into a problem with using **kwargs as a catchall parameter in cherrypy while sending the data into a form built with WTForms. Like this:


def index(self, **kwargs):
sf = forms.SearchForm(kwargs)

This leads to an error:

TypeError: formdata should be a multidict-type wrapper that supports the 'getlist' method

The reason is that WTForms expects something that supports the ‘getlist’ method while kwargs is a plain dictionary and does not have any ‘getlist’ method. The solution i found was to subclass dict and just add the getlist method. As far as I know, getlist refers to a method in the official cgi module and the cgi module documentation says that

This method always returns a list of values associated with form field name. The method returns an empty list if no such form field or value exists for name. It returns a list consisting of one item if only one such value exists.

So, a simple implementation of a subclass of dict that just adds the getlist method looks like this:


class InputDict(dict):
def getlist(self, arg):
for key in self.keys():
if self.has_key(arg):
if isinstance(self[arg], list):
return self[arg]
else:
return [self[arg]]
else:
return []

And we can use it to fill our form:


def index(self, **kwargs):
sf = forms.SearchForm(InputDict(kwargs))

Highlighting WordPress posts

November 11th, 2012

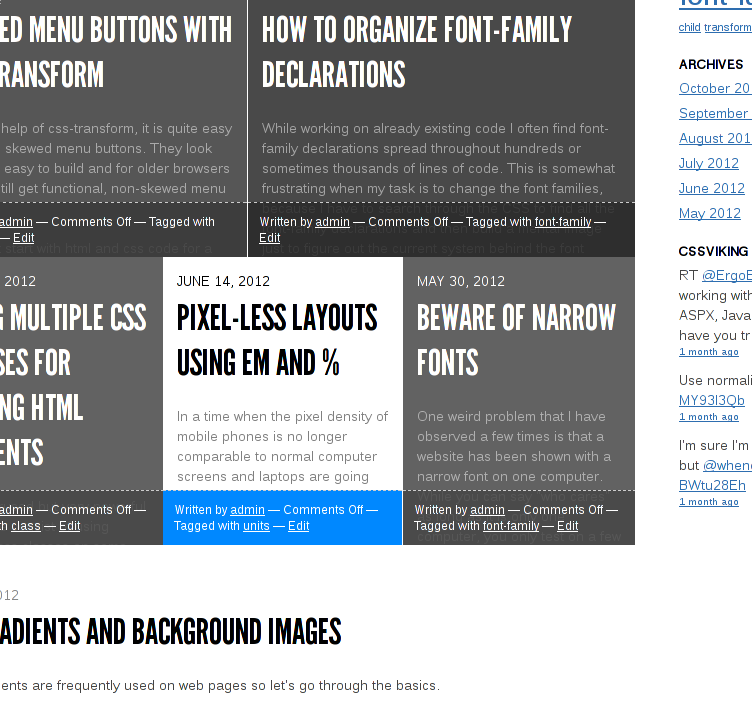
A trick I just discovered while trying to spice up CSS Viking is to use a category as a flag for highlighting an article. This is very easy because every article gets category-categoryname, tag-tagname etc. as classnames on its’ article element. This is theme-dependent but it works in the current default theme (WordPress 2012), Blaskan and probably most other modern themes.

I don’t display categories on CSS Viking (just tags) so I made a category named highlight that will be used for highlighting posts. Since it is not displayed the only effect is that articles are given the class category-highlight.

There are endless possibilities to visually highlight an article, but the currently used code for this is the following:


/* Highlighted articles on frontpage */
body.home article.category-highlight {
background-color: #FFFFFF;
color: #000000;
}
body.home article.category-highlight * {
color: #000000;
}
body.home article.category-highlight footer {
background-color: #0088FF;
color: #FFFFFF;
}
body.home article.category-highlight footer * {
color: #FFFFFF;
}
body.home article.category-highlight:hover {
background-color: #FFFFFF;
color: #000000;
}

And it looks like this at the monent (the white/blue one is the higlighted):
A part of the CSS Viking frontpage with a highlighted article

The current code higlights an article only on the frontpage but the class category-highlight is applied to the article in most other views too so it can be highlighted wherever it is displayed. If you don’t want to use a category for this, consider using a tag (and make sure tags are not displayed in your theme) or install a plugin that provides something usable for this. I’m sure they exist but a two-minute search didn’t uncover any of them.

A simpler way to right-align a block-level element

December 3rd, 2011

The standard way to right-align a block-level element is to float it. It works well and is simple if you don’t mind that the following content creeps up beside your element. If you want that, fine. If not, you need to add a clearfix hack or make sure that the following content content clears your element.

A different and simple way to achieve the right-alignment that also makes sure that following content doesn’t creep up can be achieved with some margin-trickery.

As a start, we take a look at the html and css that is used to center a block-level element within its parent:
<div class="parent">
<div class="block">
</div>
<p>Some other content</p>
</div>

.parent {
border: 1px solid black;
width: 500px;
}
.block {
background-color: blue;
margin-left: auto;
margin-right: auto;
height: 100px;
width: 250px;
}

background-color, height and border are only included to visualize the elements.

What we want to achieve is simply done by setting the right margin to zero:
.block {
background-color: blue;
margin-left: auto;
margin-right: 0;
height: 100px;
width: 250px;
}

This also has the added benefit of introducing less side effects for older versions of Internet Explorer than the use of floating. Handy if you or your clients care about that.

View sample page

A cache module for python CGI scripts

October 14th, 2008

After an earlier failed attempt at writing a cache module for python CGI scripts, a not-so-nice email from one of my web hosts made me try again after they mentioned they have no plans for enabling Apache’s mod_cache module. I suspect that the pickle module somehow messed up my previous attempt, leaving me with no other choice than to disable it and burden the server more than needed.

The building blocks for a flat-file cache module is a unique mapping from url to filename and a place to store the files. An md5 hash creates a sufficiently unique mapping and a directory is a nice place to store files. We also need a time limit (in seconds) so the web pages are not stored forever.

The complete module


"""A module that writes a webpage to a file so it can be restored at a later time
Interface:
filecache.write(...)
filecache.read(...)
"""

import time
import os
import md5

def key(url):
k = md5.new()
k.update(url)
return k.hexdigest()

def filename(basedir, url):
return "%s/%s.txt"%(basedir, key(url))

def write(url, basedir, content):
""" Write content to cache file in basedir for url"""
fh = file(filename(basedir, url), mode="w")
fh.write(content)
fh.close()

def read(url, basedir, timeout):
"""Read cached content for url in basedir if it is fresher than timeout (in seconds)"""
fname = filename(basedir, url)
content = ""
if os.path.exists(fname) and (os.stat(fname).st_mtime > time.time() - timeout):
fh = open(fname, "r")
content = fh.read()
fh.close()
return content

A minimal example, including time measurement

Instead of explaining what the functions are doing, I hope they are fairly understandable and that a usage example is sufficient for understanding how it works. As a bonus, the example includes timing so you can see how long it takes to build your pages from scratch as opposed to reading from cache.


import time
startTime = time.clock()

import sys
import os
import filecache

cache_timeout = 10
cache_basedir = "cache"

cache = filecache.read(os.environ.get("REQUEST_URI", ""), cache_basedir, cache_timeout)
if cache:
print cache
print ""%(time.clock() - startTime)
sys.exit()

# generete output
output ="stuff"

#Write output to cache
filecache.write(os.environ.get("REQUEST_URI", ""), cache_basedir, output)
print output
print ""%(time.clock() - startTime)

Store the example as example.py, the cache module as filecache.py and create a directory named cache. Run as


python example.py

Note that the timeout is set very low, at 10 seconds. This is fine for testing but not much more.

While this very minimal example is slower when the output is fetched from cache, I can assure you that this is not the case with more realistic web pages. In my case, I have experienced speedups from around 0.7 seconds to hardly measurable time (0.00 to 0.01 seconds). This does not include the time needed to start the Python interpreter and importing the time module so a very popular site might still get you in trouble with your web host. I think the mod_cache module for Apache would take care of that too, but that wasn’t available in my case.

There is no way to remove the cache other than a rm * or similar in the cache directory. It works for me but probably not for a very dynamic site.

This cache module is used in production at Good Web Hosting Info with a timeout of one hour. The time measurement is shown at the bottom of the source code. It’s not a very busy site so it’s quite likely to get a page built from scratch if you look beyond the front page. The time precision is 1/100 second so cached pages normally have 0.000 of 0.010 seconds.

The python files are also available from here.